


Car Racing
I'm a big fan of car racing ingeneral. but I really open wheel car racing such as Formula 1 and IndyCar. This is the proof :)


Match Lamp
First Prototype of a Lamp inspired by a box of matches


Inputs and Outputs - Week 3
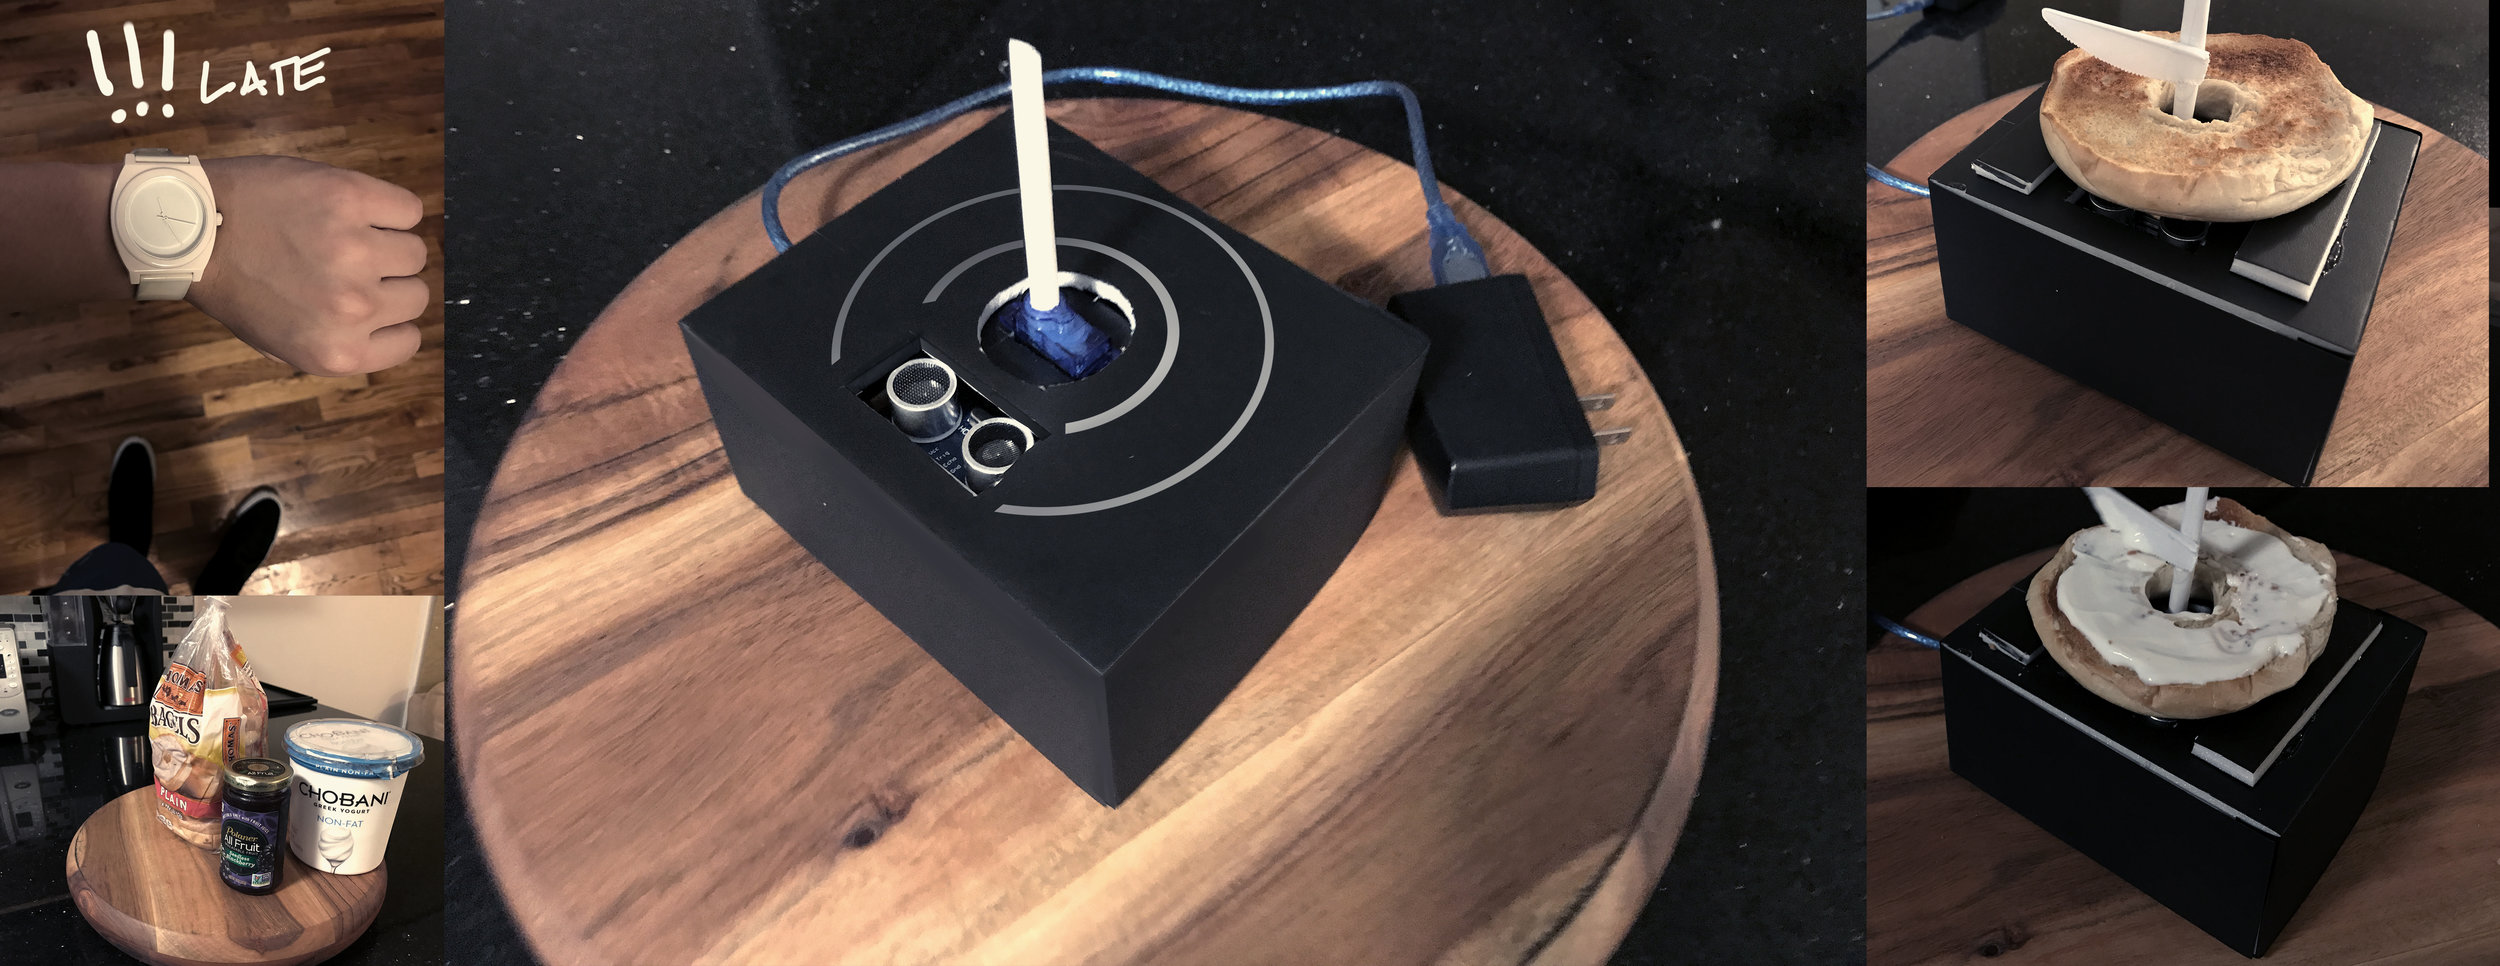
Hey! This is just a funny experiment where I play with an Arduino, connected to a Distance Sensor and a Servo Motor. When the object is close to the sensor (Less than 5cms) the Servo motor is activate it doing a sweep movement. When the object gets away, the servo motor shuts down.
I applied this configuration to a funny exercise of adding Cream Cheese to a Bagel. Everyday breakfast in New York City.
Next you will find pictures of the process, a short video and the code!

#include <Servo.h>
#define trigPin 7
#define echoPin 6

Servo servo;


void setup()

{

  Serial.begin (9600);
  pinMode(trigPin, OUTPUT);
  pinMode(echoPin, INPUT);
  servo.attach(8);

}

void loop()

{

  long duration, distance;
  digitalWrite(trigPin, LOW);
  delayMicroseconds(2);
  digitalWrite(trigPin, HIGH);
  delayMicroseconds(10);
  digitalWrite(trigPin, LOW);

  int pos = 0;

  duration = pulseIn(echoPin, HIGH);
  distance = (duration/2) / 29.1;

  if (distance < 5)

  {

  Serial.println("the distance is less than 5");

  //servo.write(120);

  for (pos = 0; pos <= 180; pos += 1) { // goes from 0 degrees to 180 degrees
    // in steps of 1 degree
    servo.write(pos);              // tell servo to go to position in variable 'pos'
    delay(5);                       // waits 15ms for the servo to reach the position
  }
  for (pos = 180; pos >= 0; pos -= 1) { // goes from 180 degrees to 0 degrees
    servo.write(pos);              // tell servo to go to position in variable 'pos'
    delay(5);                       // waits 15ms for the servo to reach the position
  }

  }

  else

  {

  servo.write(0);

  }

  if (distance > 60 || distance <= 0)

  {

  Serial.println("The distance is more than 60");

  }

  else

  {

  Serial.print(distance);

  Serial.println(" cm");

  }

  delay(500);

}
Inputs: Digital & Analog
This week I'm experimenting with digital and analog inputs. In the following case, I used the x axis of a joystick in order to control the linear rotation of a servo motor.
Materials
- Arduino UNO
- XY Dual Axis Joystick Module
- Wire jumpers
- Breadboard
- Servo Motor SG90

Code
#include <Servo.h>

Servo servo; /*Create a servo object*/
int portCom; /*Create a variable to almacenate all the data coming from the joystick*/
int servoPin = 11; /*Digital Pin Connected to Servo*/

void setup(){
  servo.attach(servoPin);
  servo.write(90);  /*Initiate the servo in 90 degreess*/
}

void loop(){
  portCom = analogRead(0); /*X Pin to receive data*/
  portCom = map(portCom, 0, 1023, 0, 180); /*Map of th received data*/
  servo.write(portCom); /*Servo moves accorurding with the position of the joystick*/
  delay(15); /*Reading time of the Analog Pin A0*/
}
Intro to Physical Computing
Let's start doing some stuff...
Hey! This is the first post of a series of experimentation with different technologies, platforms and physical computing. This is also part of my work in the class Creativity and Computation Lab guided by MFA Danli Hu (www.hudanli.com).
In the next images and videos you will see some work with LEDs, Arduino, buttons and potentiometers.
A. LED + Button (Blinking Effect)
Using a microcontroller, a regular LED + 2 resistors (220K and 1K)

LED+Button_Blink_
B. LED + Button (Switch Effect)
C. Sequential LEDs - Playing with patterns
Playing with different LEDs controlled by the microcontroller and the delay in the code

Sequencial_LEDs
D. LED controlled by a Potentiometer
Controlling the intensity of the light with a Potentiometer

LED+Potentiometer_DarioNarvaez